
Making it nice. Concours later, maybe, but damned nice now. We’ll see what the future brings!
I disassembled the rear tailgate and, since it’s pretty nice, sent it to my favorite powder-coater for a new, tough covering. I also took the time to plate all of the screws to make them pretty and stuff.
Picture of powder-coated parts. Tailgate is off to the powder coater. the rear bumper just needs a good polish, and I’m giving the tailgate mount a healthy wire-brushing and a coat of Eastwood Chassis Black paint.
While I did zinc the hardware, I’ll only use it where it’s exposed. The 7mm bits that you can’t see will be new stainless, although I think I might grind the tops to make them cleaner and not be so… “modern”. The bumper already had been done mostly in modern hardware anyway but it was rusty as hell. Stinless means never having to think about it again.
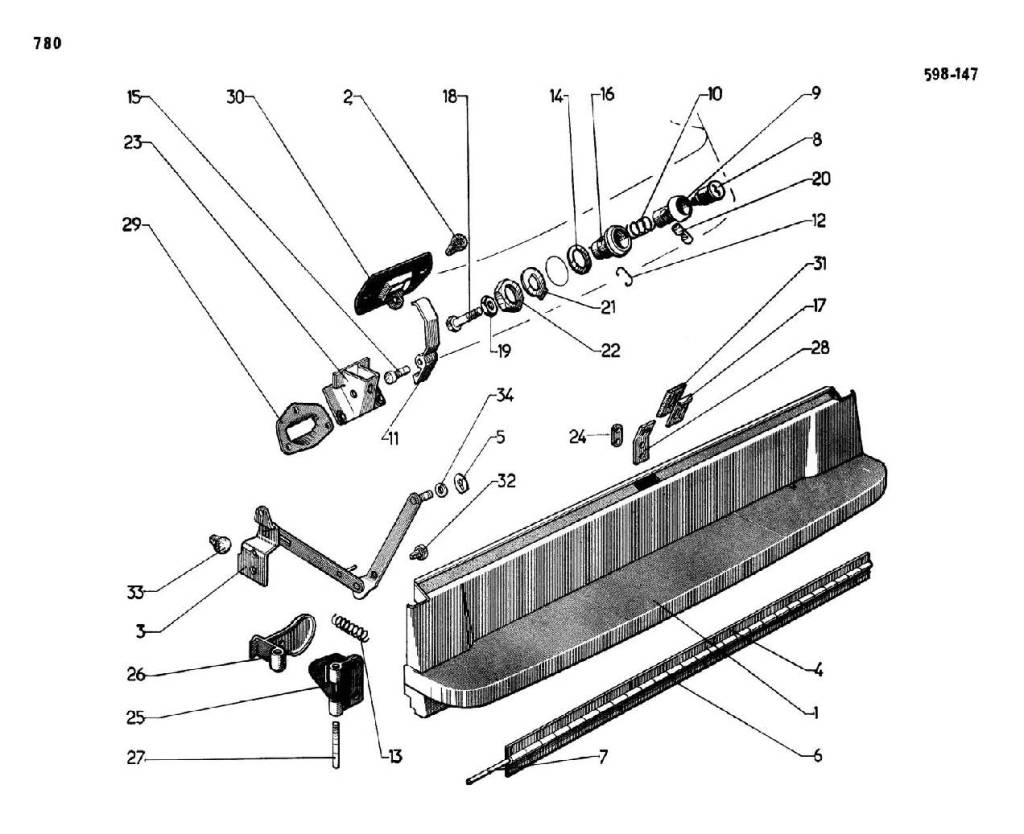
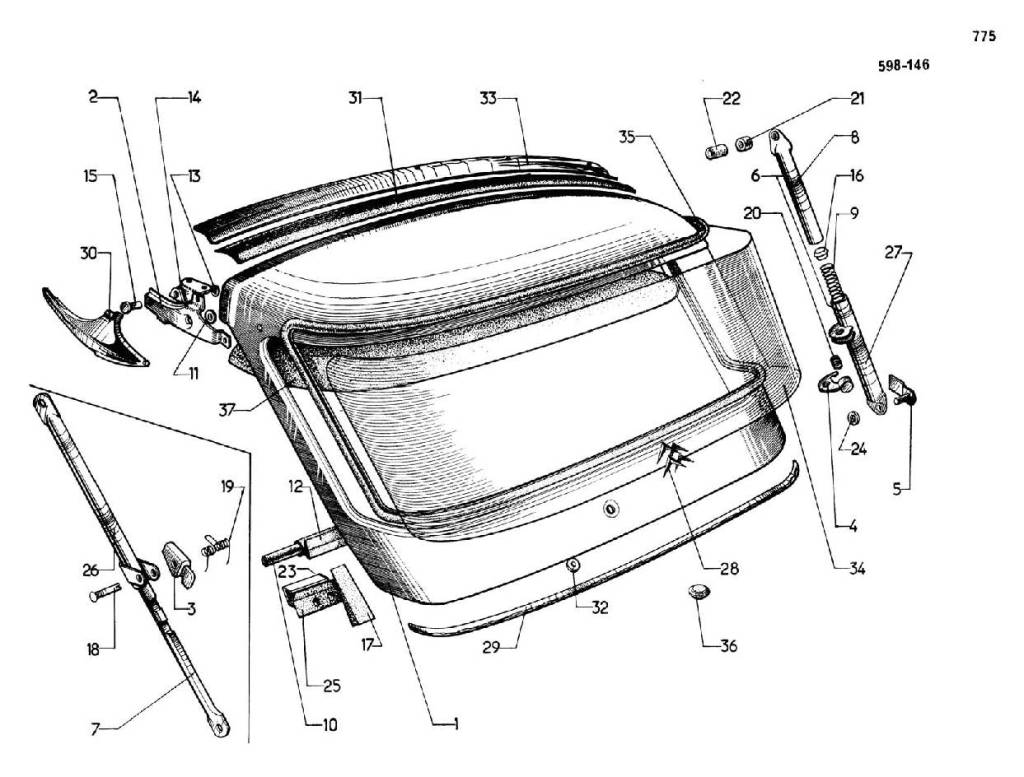
Here are a couple of factory exploded drawings of the area for reference. I used these extensively to get things nailed down. it wasn’t easy to remember everything, and even with parts manuals, it’s a bear.

So I powdercoated the rear bumper in RA7044, which is as close to “Gris Rose” as I care to go, and that shade is nice. Before Installing, I reassembled the rear bumper, with the hinge on the bumper side, then used a floor jack (seen below) and a helper to align the hinge to the bolt holes in the body (HIGHLY recommend a drift pin to align these bolts as they have a lot of side-to-side play. Using new stainless hardware I bolted everything in place.
(IF I were going to do a “concours” restoration, I would put the original 12mm bolts back in after I replated them. You’ll see in the following pictures that I did this where the bolts were exposed, but since this is a driver and these bolts are under the car and exposed to the elements that occurr in Michigan, I opted for a lot of high-strength stainless steel fasteners to keep things nice for years)

Once the tailgate was bolted in “hand tight, I started to attach the latches and tailgate stops. Here I used original bolts that I painstakingly cleaned and re-plated using a Caswell plating kit. Since the tailgate was powder coated instead of painted, I also made sure that things would fit nice by running a 7mm tap throught the holes to facilitate a nice fit.

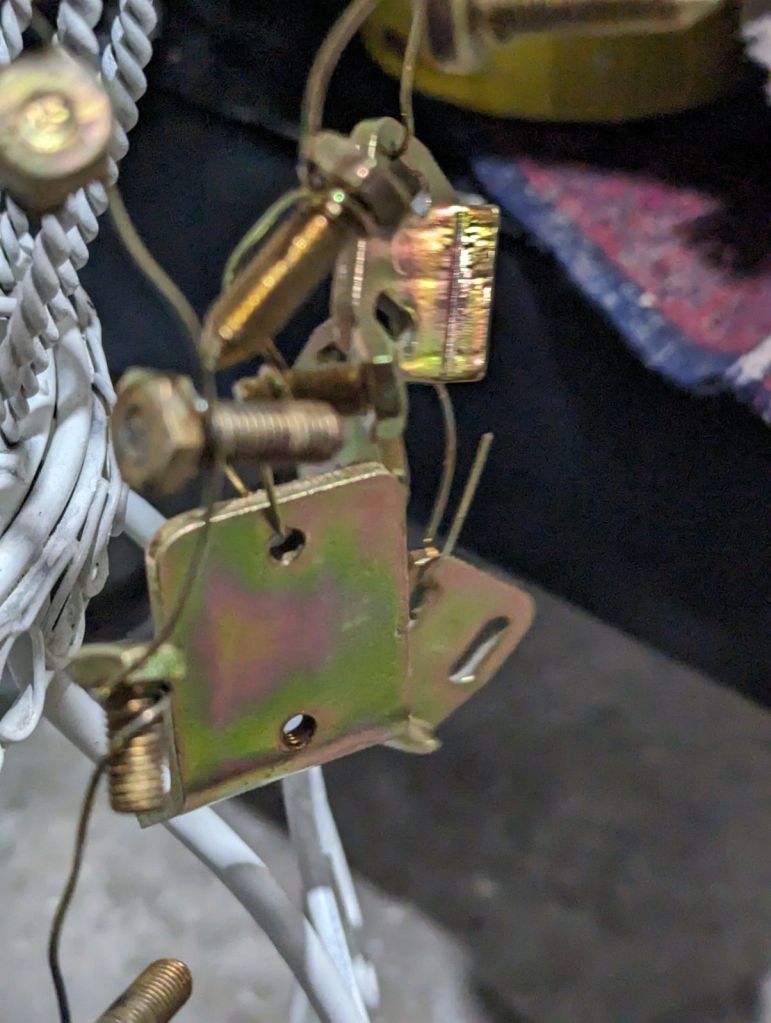
Here is a detail of the latch bolted in with the hinge in place. note the sliding collar to hold the hinge. Using a drift, I peened it over into the slot to keep it from slipping out at an inopportune moment.

Another picture of the latch as it is closed. Note that the latch doesn’t quite fit well into it’s locking hasp — that’s the reason I didn’t tighten things down on the tailgate hinge.
While the tailgate is in the locking position and held in place by a floor jack exerting forward and only slightly upper pressure (I did this by slipping a “pool noodle” between the jack and the bumper so it would push it forward a bit and not exert too much upward pressure), I used some wooden paint sticks to move the gate side-to-side and align all of the rubber seals in the body against the tailgate channels. I then pushed the tailgate into place tightly and tightened up the bolts fastening the main hinge just a little more till they were just passed “hand tight, but the channels were hard up against the sealing rubbers.
I then checked to be sure that the tailgate was sitting against the lowest sealing rubber and that the gate was tight. I also made sure to….

ehceck that the body-side hasp was adjusted correctly to be even with the tailgate latch and also hold the tailgate tight against the seals. This is a very fiddly process. Turn on some music and just be prepared to constantly tighten and loosen a bunch of bolts until it’s perfect. Then tighten the hell out of everything using a little bit of blue loctite and lock nuts.
Turn the music off and pop a beer. You did a thing.

The last step is to install the latch for the top hatch. It goes in straightforward, and really doesn’t take much to get it adjusted.

I’ll be doing the top hatch next as it goes off to the powder coater in the next couple of days. The body parts are being readied for the painter too, so expect some goodness there!

Leave a comment